Email is the need of today’s era and is being used by everyone in offices, homes, and for personal use as well. With the passage of time, email service providers have also evolved and enhanced their features like calendars, contacts, cloud storage, etc. Likewise, there exists Verizon Email.
However, Verizon Email is no longer available to its users and all its users have been transfer to a different platform called AOL. Still, there are so many users who are facing Verizon email issues or Verizon Webmail problems. In order to cater to these users, I have come up with a guide offering several solutions to tackle the same.
It becomes frustrating, whenever you see any issue with Verizon email as the issue consumes your precious time and efforts and does not allow you to get indulge in any of the productive tasks. The same has happened with Mr. Johnson. I remember how much he suffered because of this issue. He could not reply to the vital emails and also, could not check the emails consisting of several important pieces of information. So, if you do not want this to happen with you, stay alert and follow the solutions provided below.
Solutions to Verizon Email Issue
Ahead from here, you will be provided with certain solutions to tackle the Verizon email issue. Follow them and get the issue resolve. Before diving into the solutions, one of the main points I would like to mention here is that solutions are describe in a way so that even the novice does not face any difficulty while following them.
So, without wasting time, let’s start with the solutions.
Solution 1: Check The Server of Verizon Email
Is Verizon webmail down? There is a possibility of it and to check it, you may reach “https://downdetector.com/”. Here you will be provided the exact status of the Verizon Email and on the basis of it, you should decide whether to move ahead with the series of solutions or not. If the server is down, there is no advantage of moving ahead with the solutions as none of them can start the server. Only server administrators can tackle server-related issues.
Solution 2: Check Internet Connectivity
It is essential to check whether internet connectivity is the culprit or not. Sometimes poor internet connection can lead the website inaccessible and it becomes problematic for an individual to access it. To cope with this, you should contact the ISP (Internet Service Provider) and ask them to resolve the issue as soon as possible and at your end, you may try restarting the mobile phone or modem (whichever you are using). After following this solution, check whether it resolves the issue or not. If not, proceed with the next solution.
Solution 3: Remove Temporary Files From The Web Browser
Every web browser creates certain temporary files also known as cache and cookies. With the passage of time, these start growing. Later, when these get convert into a huge dump. It becomes problematic as the web browser starts lagging and sometimes becomes unresponsive. So, here comes the requirement of removing this dump from the memory of the web browser, and in order to achieve this simply follow the below steps.
Since web browsers are huge in number, so for the sake of convenience I am taking the example of Google Chrome.
- Launch the Google Chrome web browser
- Click on the Menu button and choose “Settings”
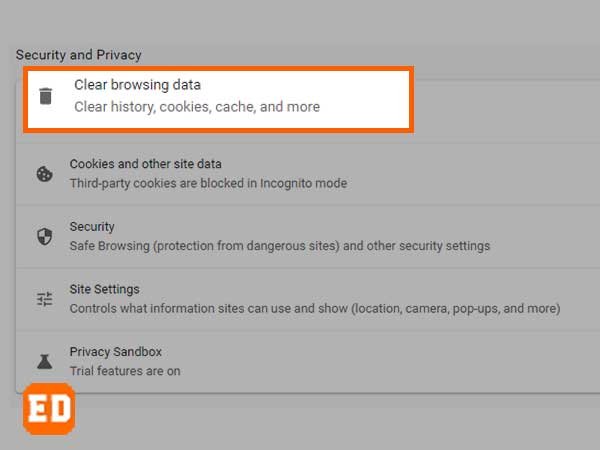
- Now, choose the “Security and Privacy” option from several options
- Click on the “Clear Browsing Data” option from the right pane. As shown in the below image.
- Choose the “advanced” tab, also shown in the below image

- Once reached the advanced tab, choose the “Clear Data” button
By following the above steps, you can clear the aggregation of the cache and cookies leading the browser to become fresh and I hope till this point you might have resolved the issue if it was related to the web browser. If not, let’s proceed with the next solution.
Solution 4: Try Disabling The Antivirus or Firewall
Sometimes antivirus or any security program creates hindrances in the full-fledged working of any software. When it comes to Verizon email, antivirus might also be the culprit here. So, it is essential to disable the real-time protection feature of an antivirus. Every antivirus has a distinct way of disabling real-time protection. Once you disable it, check again whether it resolves the Verizon email issue or not. If the issue still persists, you may follow the forthcoming solutions.
Solution 5: Disable The Extension From Web Browser
If you are operating Verizon email on the web browser and facing the issue. In this case, you should try disabling the extensions residing in the web browser as sometimes extensions are found creating obstacles in the seamless operation of the Verizon email. To disable them, you may follow the below steps sequentially.
- Launch Google Chrome web browser
- Go to “Menu” and choose the “Settings” option from the cluster of options
- Search and choose the “Extensions”
By going through the above steps you will have an extensions panel opened up in front of you. It will look similar to the below-mentioned image.

Once the extensions panel is open you may disable the extensions one by one and check which extension was the culprit or causing the issue. Along the side, keep checking the Verizon email webpage. If it does not resolve the issue you may try the next solution.
Solution 6: Reset The Forgotten Password
It might be possible that you have lost the password of the Verizon Email account and that is why you are unable to check it. If you do not know how to reset the password of a Verizon email, do not panic as the steps to achieve the same have been provided below. Hope it will resolve the issue related to the Verizon email.
- Begin by opening the “Verizon email login page”. You may reach it either by this link verizon.yahoo.com or by this link mail.aol.com
- Once you reached the Verizon.net login page, choose the “Forgot Info” option
- Now you must have been in the front of the “Verizon forgot password page” and now you are require to enter the user ID.
- After entering the “user-id”, click on the “Continue” button and follow onscreen instructions.
- After a while, you will receive a temporary password on your smartphone linked to the Verizon email account
- Now, enter that temporary password into the required textbox
- Once done with the above step, Now you will be require to enter the password and retype the password. Thus, this way you will have created a strong password and also recovered the same.
- Click on the “Finish” button
- Hence, by undergoing the above steps, you will be having a strong password and the lost password will also get recover.
Solution 7: Check Settings of Verizon Email Server
If you are accessing the Verizon email on email clients like Outlook, Mozilla Thunderbird, etc. You will be require to enter the Verizon email server settings. Any mismatch in server settings can lead the Verizon email to a non-performing state. Later, it can become troublesome for its users. So, in order to have it working seamlessly, you should check the server settings by matching the values from the below-mentioned data. Also, among several available protocols, you should choose IMAP and SMTP. IMAP is required to fetch the data from the server and SMTP is require to send or receive the email. You may skip the POP protocol.
- Incoming Mail Server (IMAP)
- Name: imap.aol.com
- Outgoing Mail Server (SMTP)
- Name: smtp.verizon.net
- Incoming Mail Server (IMAP) Port: 993
- Outgoing Mail Server (SMTP) port: 465 with SSL
- Type of Encrypted connection: SSL
Solution 8: Verizon Email Account Configuration in Outlook Email Client
If you are trying to access the Verizon email on the Outlook email client, it is necessary to configure it in accordance with the same. The process of setting up the Verizon email into the Outlook email client is given below.
- First of all launch the MS Outlook by double-clicking on it
- Once it is launch, go to its “File” section
- Choose “Files group” and later click on the “Info” option
- Now, select “Account Settings”
- Ahead of it, choose “Email Tab” and select the option “New”. This way a “Add new Account” window will be open.
- Now, choose by ticking on the checkmark “Manual Setup and additional server types”
- Click on the “Next” button
- Now, “Choose Service” will be open, further of it select “Internet Email” radio button
- A new window of “Internet Email settings” will be open.
- Now, you are require to enter the information into the “User Information Tab”
- Choose “Server Information Tab” and select IMAP as Verizon’s Server Type
Once you have reached here, enter the IMAP server details as mentioned above. Once you are done with entering the settings, you should jump to the “Login” page, and there, you are suppose to enter the login credentials and later, check whether your Verizon Email account is running smoothly or not.
So, this was all about the issue titled “Verizon email not working”. By going through the above-depicted solutions sequentially, you may have resolved the issue. If you are using Verizon email on an Outlook email client and emails are not being shown up there, do not panic as the last solution is about the same and has been describe in detail. Hope you might have resolved the issue till this point.